Sunday, September 2, 2012

Making A Scoop Part 2

Now that I'm not frantically trying to get the car back together for the next race, I have some time to write this second post on the scoop.  In Part 1 I showed how I was applying bondo over the foam and sanding it smooth.  Here are the two main pieces (top and bottom) after that process was completed.


It was then time to cut the pieces apart again so that I could make five different "plugs" that I could fiberglass.  I used a hacksaw to cut the pieces.


I wanted a lip around the top and bottom pieces so that I could join them together using 10-32 screws.  In order to create that lip, I fastened each of the pieces to flashing that I bent so that it had a 90 degree angle.


I used some 1" long wood screws to attach the pieces to the metal.  The foam is dense enough to allow the screws to take hold of it but I had to make sure that I didn't overtighted the screws.  I used modeling clay in order to fill the gaps between the pieces and the metal.


Once all the gaps were filled, I could then lay out the fiberglass cloth and cut my pieces.  Even though this process can take a long time, I have found that it really pays off when laying out the fiberglass with the resin.  I used several layers of really thin cloth, one layer of fiberglass matt, one layer of heavy cloth, and then finished up with another layer of really thin cloth.  Here are a couple pics of me laying out the cloth.


The pic on the left shows the thin light cloth and the pic on the right shows the heavy cloth.  The thin light cloth obviously conforms to the curves and sharp turns a lot easier so it is important to start off with that.  Frankly, all of these pieces would have come out a lot better if they were vacuum bagged but I don't have that equipment so I made do with what I had.

After I had all my cloth cut, I then applied mold release wax and the mold release liquid.  The liquid is green and dries to a very thin film.  I applied two coats of wax and two coats of the liquid.  The pic on the left below does not have the mold release materials applied and the piece on the right does.


Ok, let the fiberglassing begin!!  Btw, I ALWAYS wear proper respiratory gear and have fans running when I do this in the garage -- fiberglass resin fumes are not good for you! 


After the resin dried, I could then use plastic wedges to remove the pieces from the plugs.  Here are the pieces before being trimmed all the way.  Btw, the red is just magic marker that I used when drawing my "cut" lines on the cloth.


I then trimmed them and glued them together with high strength epoxy.  I also laid a strip of fiberglass matt along the main seams.


The flat panel filter needed a ledge to sit on so i made some pieces out of aluminum and pop riveted them into the bottom piece.


One problem that I ran into was that the scoop was a little too long and wouldn't fit between the throttle body and the main bulkhead.  So I ended up having to cut off the front part of the bottom piece and in order to get it to fit in a short period of time I fabricated a piece of aluminum to fill in the front part of the bottom piece.  I also ended up trimming the front part of the top piece a little more.  But I eventually got it to fit.


I think it actually came out pretty good.  There is only one problem -- I don't like it very much.  :>)  Although I think it is much better than just using a cone filter, my helmet actually ends up being directly in front of it so I think I would be better off having a scoop that is in the air stream.  The wheels in my head are already turning as far as other possibilities and I just might be able to use the bottom piece of the scoop.  Changing it will probably end up being a winter project.


Wednesday, August 29, 2012

Mission Accomplished!!

This is another quick post to give an update on my first F1600 Series pro race weekend.  I'm happy to say that the car was pretty good right off the bat and I accomplished a number of my goals for the weekend.  1) I brought the car home in one piece, 2) I got down to a 1:16.xx lap time, and 3) I finished in the top 10 in one of the races.  I didn't go faster every session but I wasn't too far off from doing that.

All things considered, the weekend went very well.  I turned a 1:17.2 in the first session which was the fastest that I had ever been around SP.  I turned a 1:16.8 in the only qualifying session on Friday so that made me happy.  However, that time only grided me in 12th position (out of 18) for Saturday's race.  5 cars were underneath the 1:15.5 track record and 3 of them were in the 13s!!  The competition in this series is unbelievable!!  In Saturday's race I got pushed wide at T1 on the first lap by another driver and he got by me as well as another car.  However, the car that pushed me wide went off in T5 a few laps later and the other car that got by me spun in front of me at the same time so I got both of them back.  Unfortunately we were totally broken off the rest of the field by that point and I ran by myself the rest of the race.  The car didn't seem to have the grip that it had on Friday and the only dissappointing part of the weekend was that I wasn't able to get down to the 16s again.  The fast times from Saturday's race gridded us for Sunday's race and I was grided 14th for Sunday's race.

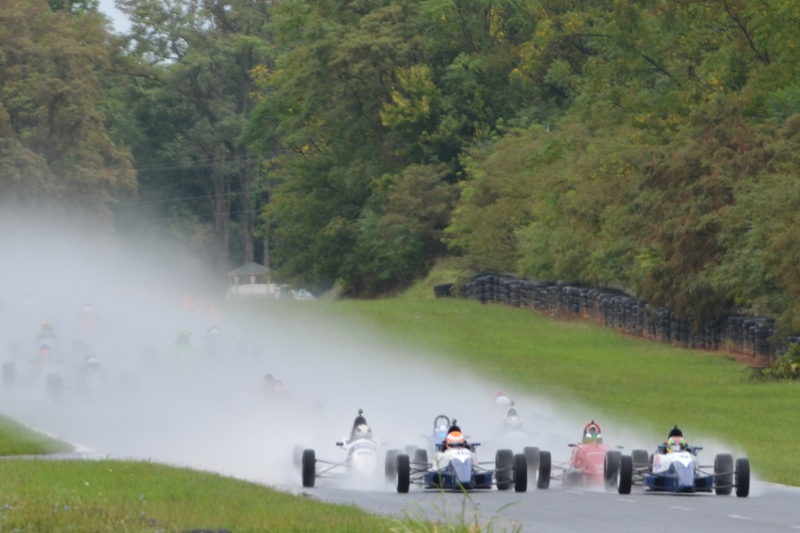
Sunday's race was much more interesting.  It was raining on and off all day.  Our race was at 11 am and at 10:30 am it was bone dry.  We had slicks on the car and they wanted up to the grid early so Terry (my wife and crew) strapped me in -- and then it started pouring.  I sat in the car for about 30 seconds and then decided that we needed to change to wets so I got out and started changing.  I almost had the left rear off when it stopped raining!  So we looked at the weather map on Terry's phone and it was showing that there was no rain over us.  So I left the slicks on, got back in the car, Terry strapped me in -- and you probably guessed it, it started raining again!!  But now it was about 10 till 11 and since it was just Terry and I we didn't have time to change to wets so off to the grid I went.  I got up there and all but 3 cars (including myself) were on wets.  A friend and long time racer, Tim, came over and asked Terry if we had rain tires.  She said yes but didn't have time to change.  I motioned to Tim to lean down and talk to me and I asked him if I was making a big mistake.  He said yes and that we should go change to wets.  So back to the trailer I went.  I got out of the car to help and Tim told me to get back in the car so Terry strapped me in for the 3rd time while he was changing the tires.  One of the guys from Hoosier came over as well as a couple of motorcycle competitors so it was really pretty amazing how quickly the tires got changed.  I got back to the grid when the cars were going on track so I started dead last (17th).  But at least I was on track with the right tires on the car!!  I was back up to 14th or so before the start finish line and I just decided to keep the car on course and finish.  I didn't turn any real fast times but I did make a couple of good passes on other cars.  However, a lot of people went off track and brought the car home in 9th.  I'm happy with a top 10 finish in that group -- I don't car what the conditions are!!  Here is a pic of the start of Sunday's race as we were approaching turn 1.  I'm deep in the spray and couldn't see hardly anything!


The one thing that I still need to work on is my shifting.  I was trying to go from 4th to 1st in the braking zones and I think I will be better off to go through the gears.  Once I'm shifting without thinking about it I think it will all become much easier and I will get faster as a result.  The weekend was obviously a lot better than the regional and the F1600 series is fantastic.  So all the hard work paid off and it is nice to not have to be working on the car in the evenings and long hours on the weekends. :) 

Thursday, August 23, 2012

Off To The Races!!

This is just a quick post and I have to apologize for not updating my blog recently but I have been a little busy getting the car ready -- which it is!! 


I even managed to finish my scoop (at least in a workable condition) so I will be posting on that later.


The F1600, F2000, and Formula Atlantic races will be at Summit Point this weekend and practice and qualifying are tomorrow.  I will be loading up the trailer this afternoon.  I feel good and I at least met the challenge of getting the car ready!  The schedule and links to results and even live audio can be found at www.f1600series.com.  Wish me luck!  I hope my luck is WAY better then the last race weekend! :)

Sunday, August 5, 2012

Making Progress

I haven't had much time to post blogs because I have been working on the car in the evenings after work and of course on the weekends but I am making progress and I'm confident that I can make the F1600 Pro Races at Summit Point this month.  K-Hill Motorsports really helped me out as far as getting the frame fixed.  I dropped it off with them two Sunday's ago and they got it sand blasted and had a welder replace the bent bars.  I got the car back the next Saturday!  Luckily the frame was not twisted so it was a little less work to fix it.  Here it is after I got it back.


Good as new!!


In order to save some time and some money, I painted the chassis with some chassis paint that is brushed on.  I can't say that the paint job is a good one but most of the frame is covered by the bodywork anyway.


You can also see the side panel to the left of the frame.  While the frame was getting repaired, I was working on that.  That repair was pretty straight forward.  Just fiberglassed and put some kevlar on the backside and filled in the cracks with short strand fiberglass putty and bondo on the front. 

A fellow racer genorously offered to sell me some used sidepods (tops and bottoms) at a good price so I purchased those.  The tops were just like mine but the bottoms were actually a different shape at the back. I didn't expect this so this meant more work. You can see that my sidepod (on the left in the pic below) is straight in the back and the one I bought is angled.


So I had several choices.  I could 1) either repair the crashed one, 2) modify my tail section to fit the side pod I bought, or 3) replace the crashed front part of my side pod with the front part of the sidepod that I bought.  I decided to go with option 3. 

I took some measurements and made a template out of cardboard in order to trace the same cutting pattern on both sidepods.  It would have been easier to cut in straight lines but I decided to cut a jagged edge because I figured it would be stronger and the two pieces would fit together like puzzle pieces.


Here are the two pieces being fitted together.  I made sure that I fitted them with the sidepod mounted on the bellypan of the car.


Unfortunately I didn't do a very good job of determining the point to cut on side of the sidepod. 


No worries though, I filled it in with spray insulation foam that I bought at Home Depot.  The pic below shows the foam as well as the two pieces joined together. 


I mounted a piece of aluminum to the bottom and used a construction adhesive between the aluminum and the sidepod as well as between the edges.  I used 1/2 inch countersunk wood screws to attach the aluminum to the sidepod.


I ground down the points of the screws on the topside and put a piece of fiberglass on top.  Once I had the two pieces joined, it was just a matter of fiberglassing the remaining cracks and applying some bondo on top.  Here is the finished frankenpod with the smashed up bit next to it.


And here are the pieces mounted to the chassis.  They just need paint now!!


And here is a pic of the chassis after today's work.


So, decent progress but it is full steam ahead until it is done!  I would actually like to have my scoop done before the pro races as well but I'm not as confident about that -- it certainly isn't as important either.


Saturday, July 21, 2012

Fixing the car!!

I must say that my tune has changed quite a bit since my last post.  I have to admit that I was quite depressed and dissappointed but I have received quite a bit of encouragement and support from friends and family and I'm now very motivated to get the car fixed before the F1600 pro race at Summit Point the weekend of August 24th.  The main thing that needs to be fixed is of course is the frame and here are some pics of the damage.


And here are some pics of the other damage.


That's the bad news but the good news is that I have been tearing down the car in the evenings and today and have gotten it down to the bare frame so that it can be welded.  I will be dropping it off with someone tomorrow to have it sand blasted on Monday and then it will be given to a welder that has a surface plate and the necessary tools to repair it.


I can re-glass the side panel and a fellow racer has offered to sell me some sidepods and radiator shrouds so I will be getting those in a next couple of weeks.  I have the A-Arms and I might have a steering link and I might have a lead on a used radiator but if that falls through then I can order a new one.  I have actually already repaired the fuel cell cover by pounding the aluminium back into shape. When stripping the car, I tried to do it by undoing the least amount of stuff as possible so that it will be faster to put it all together.  For example, since I used the weather pack connectors, I was able to remove all of the wiring with the engine and without disconnecting all of the sensors attached to the engine.


So, it is a good start and I have a month to get the car ready.  As long as the frame is repaired pretty quickly then I have a good shot of making it.  I love a challenge!!


Monday, July 16, 2012

Bad News

I know that there is a risk to being on the race track and that crashes are inevitable but I was really hoping not to experience one so soon with this car.  I entered the regional race at Summit Point this past weekend.  It was a small group of cars but there were a couple of cars that should have been much faster than my car but the drivers didn't drive them fast enough.  One of them was a Formula Atlantic (the fastest open wheel car that we race with).  At the beggining of the race, he was taking the corners way too slow and I was right behind him.  Him being slow in the corners was bunching up the cars behind me and going into Turn 1 a Club Ford launched over another Club Ford and into the right side of my car.  Here is the video and a couple of screen shots.


I haven't taken a real close look at the car but I can see that the frame rails on the right hand side are bent in about 4 inches and the welds are broken at the rear bulk head.  The right side pod is toast along with the radiator, an A-Arm, and a steering tie rod.  I think I can fix the side panel but I'm sure I will find more stuff once I strip it down.  The good news is that the car did its job and protected me.  I have a bruised arm and a couple of other bruises but I'm fine otherwise.  Just dissapointed.  I always said that racing teaches you perseverence and I will persevere after this and will get the car fixed.  Unfortunately I think this ruins my racing plans for this year and the pro races that I was planning to enter are probably out.

Before this happened, I was run off the road by a C Sports Racer on Friday during the test day.  The driver didn't think he did anything wrong.  You make the call.


The only good news from the weekend was that I made good progress with the car on the test day and got down to a 1:17.8.  I was at least heading in the right direction.

Monday, July 2, 2012

Making A Scoop Part 1

Note:  I actually wrote this blog yesterday in Word because I couldn't publish it due to not having an internet connection -- we were without power for two days as explained below.

For the last few weeks I have been working feverishly on a scoop that I wanted to have ready before the regional race at Summit Point on July 15th.  The scoop design has been bouncing around in my head for months so it felt good to be able to focus on making it.  However, the storms that blew through the Washington DC area Friday night have greatly hampered my planned weekend progress.  A tree fell on the garage roof and we have been without power since about Friday night.  Luckily I had the generator that we use for racing in the shed so we have some power and I bought a portable Air Conditioner Saturday morning so the house isn't too hot.  On reason I bought that is so that I can use it in the garage after power is restored.  :)  I can't do much work on the scoop without power but I can get to the internet with a mobile broadband stick so I figured I would update the blog -- it has been a while anyway!

Before I get into the making of the scoop, the reason why it is important is because air intakes work much better if there is a low pressure area (created by having air go through a small hole into a larger chamber) and you also want the air to be as cool as possible.  The engine came with a K&N cone air filter and I can certainly run the car with just that filter.  But I think the engine should create a little more hp with a good scoop/cold air box and I’m going to use a rectangular panel air filter.  When the scoop is finished, it will be comprised of two pieces – a bottom piece that holds the air filter and attaches to the throttle body and a top piece that will be in the air stream.  The two will be joined in a manner that I haven’t decided on yet but most likely 10-32 screws.  There are a few ways to create pieces like this.  One way is to shape styrofoam (the type used for packing things) cover it with clear packing tape (this is necessary because fiberglass resin melts the styrofoam), fiberglass over it, and then use laquer thinner to desolve the styrofoam after the fiberglass has hardened.  It is a good, quick way to make something but the piece ends up being pretty rough and a lot of work needs done with bondo to make it look good. 

I'm mainly using the two part foam that I have used in other areas of this project.  This foam does not dissolve when coming in contact with fiberglass resin or lacquer thinner.  The scoop is going to sit in the engine bay behind my head and will be underneath the tail section in the engine bay.  First, I took some measurements and got a rough idea of how big of a piece of foam I needed to work with.  I created my own box, filled it with foam, and let it harden.


I then sanded it down to look more like a cube and marked grid lines on it to help me shape it symmetrically. 


I soon realized that I was going to need some more foam for the scoop opening.  I had some pink foam laying around so I decided to use that.  However, I wished I had used more of the two part foam because the pink foam has a much lower density and working with it was a little bit more of a challenge.  I joined the two pieces with some ¼” wooden dowel pins and some bondo.  I made sure that I only spread the bondo in the center where I wouldn’t be sanding.  Here are the pieces joined and sitting in the engine bay.

It was now time to start sculpting it.  I drew out some guide lines and cut big chunks out with a knife but sanded the rest.

The top part is narrower than the bottom because there is a ½ inch piece of rubber around the panel filter and the top piece will be on top of this rubber section so that it holds the filter in place.  Here it is in the car again.


Once I was satisfied with the basic shape, I needed to start cutting it in sections.  The reason for this is because I’m going to cover it with bondo and make them into molds which I can fiberglass over.  I will then join the fiberglass pieces together after they have hardened.  When making molds, you can not have any areas that curve in because you won’t be able to pull the fiberglass piece off of the mold.  For instance, the very front part of the scoop (the pink foam) has curves going in towards the center of the scoop to help guide the air so the mold needs to be such that I can pull the fiberglass piece straight off the front of it.  Here are the pieces that I cut apart but I also realized that I need to cut the bottom piece in half as well – which will make five separate pieces.

However, after I applied bondo and started sanding the top part of the scoop, I soon realized that I needed to join those pieces back together so that all the lines matched up and to insure that the fiberglass pieces matched up correctly.  For the front part of the scoop, I re-cut the separation line with a razor blade each time I bonded over it.  I did this before the bondo hardened all the way.  The pic below shows the challenges that I was facing with the pink foam.  Almost everytime I sanded it I ended up sanding too much and getting into the foam.  The only way to fix it is too remove some of the foam in that spot, fill it in with bondo, and re-sand.

The pieces are a little bit further along than this right now but not much.  I was really hoping to get started on fiberglassing them today this weekend but you can’t fight mother nature!