Got interviewed by a couple of different reporters for local newspapers. They are both good but I think the second article turned out the best.
Leesburg Today Article
Loudoun Times Mirror Article
Tuesday, August 23, 2011


Sunday, August 21, 2011
Bodywork Part 2
I don't have as much to report after this weekend but I did get the left side panel of the race car finished up. The templates that I made in order to locate the screw holes and the pushrod hole worked pretty well although I did have to re-do the screw hole at front and bottom of the panel and I also had to slightly elongate a couple of the holes at the back of the panel. Here are pics of the front of the panel with it installed on the car along with the left front lower A Arm and pushrod.


I did have to spend some more time with the panel because it had a bow in it which caused cracks. This is a picture of the right side panel which has the same issue. Next to it is a pic of the left side panel installed on the car and it also shows the crack that needed repairing.


The reason why this happened is because the top of the panel had to be trimmed for the rocker arm. By removing that material it weekend the panel in that area so I layed some fiberglass matt along the length of the panel on the back side where it was bowed and then layed a piece of fiberglass on the top of the panel. Here is a pic of it after it was completed.

It seems strong enough now! Next weekend I will start on the right side panel.
Sunday, August 14, 2011
Bodywork Part 1
If there is one thing that I have done a lot of over the past 14 years of racing, it is bodywork--whether it was making a new piece or repairing existing pieces. This project is going to involve a lot of bodywork and what I'm tackling now is probably considered unneccesary to many because it is strictly aesthetic and isn't going to improve the performance of the car at all. However, the car is going to get repainted and I plan on taking the car to car shows to continue my fund raising efforts for the Wounded Warrior Project so I figured I might as well make it look as good as I can since I have the time to do it. First, I'm tackling the left side panel and here are pics of the areas that I'm repairing.


Again, there is nothing wrong with the hole where the pushrod connects to the rocker but I think it will look better if it was a perfectly round hole so that is what I'm going to shoot for.

This area of the bodywork had been repaired before and what I noticed was there was a high weld on the frame so I ended up grinding that down so there wouldn't be as much strain on the fiberglass after I repaired it.

Lots of spider cracks in this area and in other areas of the car.

A broken piece of fiberglass.

Properly lining up a fiberglass panel so that the holes are properly aligned with the nutcerts installed in the frame is always a huge challenge. All of the holes on this panel had been changed multiple times plus some of the nutcerts were spinning. I think all the nutcerts installed were metric and I'm used to working with 10-32 hardware so I ended up changing all the nutcerts to 10-32 and will fix the holes.
Ok, Lets get started!!

Again, figuring out where to drill holes in fibreglass so that they are in the perfect spot is a real challenge so I came up with the idea of creating a template in aluminum and drilling a couple of 1/8" holes in it so that I can fasten it to the fibreglass with cleco fasteners. The 1/8" holes are very easy to fill in when I'm done with everything else. I also created a template for the holes for the 10-32 screws along the bottom of the panel.

Repairing fiberglass is the perfect example of tearing something down in order to rebuild it. The key with repairing fiberglass is to tear it down just enough so that you can use as much of the old material as possible. I used a dremmel to create the troughs which is where spider cracks were. This pic also shows how much material I removed where the lower A arm goes into the footwell. I also sanded down the back side of this and every other place that I am repairing.

Here is the spot where the push rod connects to the rocker. Notice how I left a ring of bare fiberglass around the hole. This is important because new fiberglass will be able to bond to it.

And one of the small holes at the bottom of the panel.

This is the back side of the panel but I used a couple pieces of aluminum (one each side) to clamp the wet fiberglass to the panel until it hardened. This helps it bond to the old material and keeps the panel straight. I did the same thing when I fiberglassed the other side.

Before laying fiberglass matt on the panel, I used short strand fiberglass filler to fill in any low spots. The fiberglass filler is much better then standard body filler in these applications because it is much stronger.

Here is the same area after sanding down the short strand fiberglass.

Here is the hole for the pushrod after I applied the short strand fiberglass and sanded it. After I layed fiberglass mat on the back side, some of it protruded through the front side so I built it up more on the back side and then sanded it flat so that I could apply the filler and cover it with another piece of fiberglass mat.

Here is the panel after the fiberglass filler was applied and sanded.

And this is the panel after I appled "Icing" which is a body filler that is designed to fill in any small imperfections like pin holes. It is also very easy to sand. This is where I stopped this weekend so next weekend I will be sanding it smooth and getting it ready for paint.
Sunday, July 31, 2011
Crush Box
With these warm temperatures, I figured it was a good time to do some bodywork so I started with the crush box. For those that don't know, the crush box is at the very front of the car and is really part of the nose. One of the sides of the crush box had a buckle in it so I used a hammer and dolly to straighten it out.

I also used the grinder with the wire wheel to strip the paint.


I also used the grinder with the wire wheel to strip the paint.

Since this car was a winged car and I'm making it a non-winged car, the next thing that I wanted to tackle was to fill in the wing bar holes. The aluminum was counter sunk where the wing bar holders were mounted so I again used the hammer and dolly to flatten those out.


The next task was to cut out pieces of aluminium to fill in the holes. The crush box is made out of 60/1000ths aluminum and I had 50/1000ths so that worked perfectly. I used another piece of aluminum to put behind the holes and pop riveted the pieces on using countersunk rivets so they would be flush.


I used the same method to fill in some smaller holes and then used some lightweight body filler to fill in the holes and rivets. I went ahead and filled in all the rivets on the sides since I already had the filler mixed.


I may end up putting a thin layer of "Icing" on the sides before it gets painted but this is good enough for now.
Saturday, July 30, 2011
Removing The Belly Pan
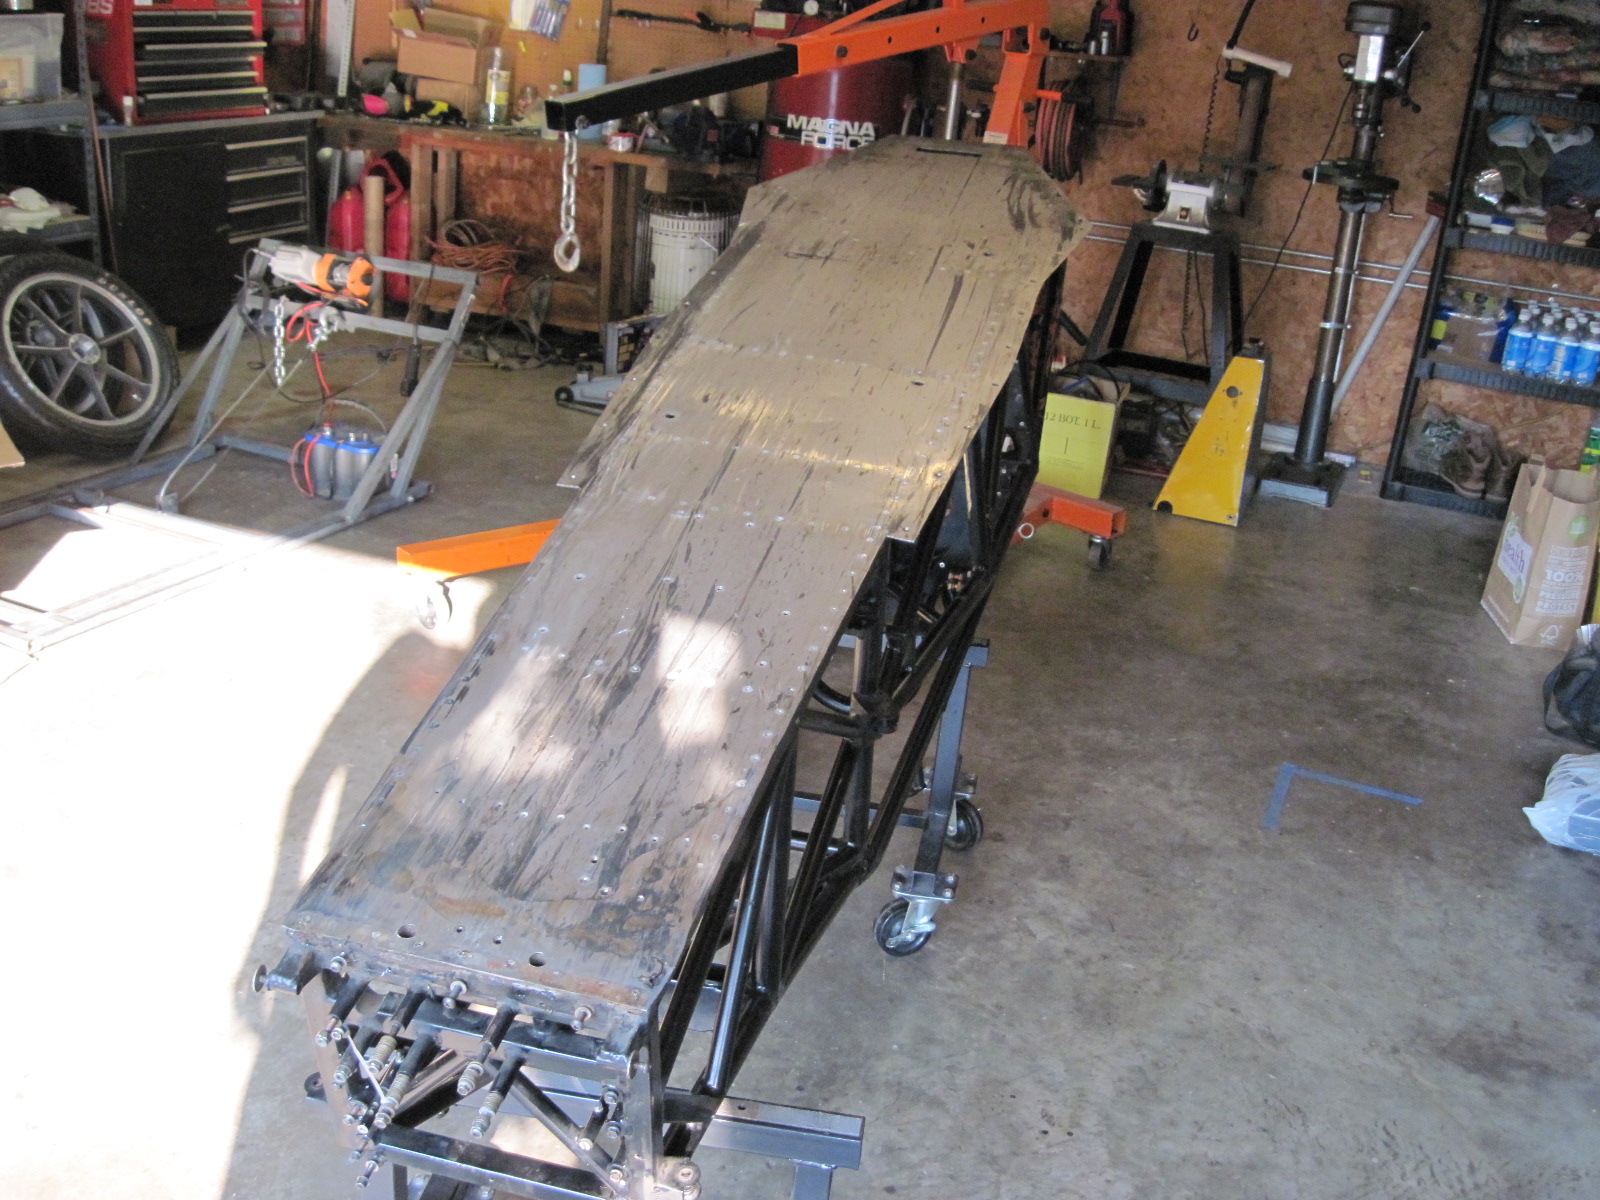
I have learned that the belly pan is a very important part of the chassis because it helps keep the chassis stiff and can make an important difference in an accident. Belly pans are not only riveted but they are also bonded to the chassis with a high strength adhesive. So, in order to get it off I had to drill out all the rivets and then get the adhesive to release. But first, I had to flip the frame over and I was alone for this task so it was time to get resouceful with my engine hoist. Here, I have seperated the transmission from the chassis.

And now the real challenge! I grabbed the frame on the side with the engine hoist and lifted so that it was now on it's side.


Half way there! I then used the hoist to grab the frame at a point where I could continue to rotate it. And then it is upside down so that I can get to the rivets.

Eric Langbein told me to be very careful drilling out the rivets because the holes in the frame should not be disturbed -- assuming that they are perfectly round and re-useable. He also told me to use a small punch to push out the mandrel of the rivet so that the drill bit is easily centered on the rivet.

There were well over 100 rivets so it took a while to finish the drilling. Not all the rivets were the same size so I had to use different size drill bits always being careful to not get into the frame. All I was really concerned out was getting the head of the rivet off. After I got done with the drilling, I then used this tool to carefully pry the belly pan away from the chassis without bending it because I am planning on using the belly pan as a template for a new belly pan.

I actually used this tool to sheer some of the rivets that I didn't loosen enough with the drill. Finally the belly pan was seperated from the chassis.

And now the discovery process continues. Even though I was careful about not distorting the holes in the chassis, the person installing this belly pan wasn't so careful. A number of the holes are oblong and a lot of them are quarter inch. Plus there was a lot of oil in between the frame and the belly pan at the back end of the car and there was rust between the belly pan and the chassis at the front of the car so the belly pan was not doing everything it was supposed to be doing and I'm really glad that I took it off!!


The next step was to get rid off the remaining adhesive so I used a grinder with a wire wheel and it worked like a charm. Here is the back end of the car and the front after being cleaned up.


As you can see, it ain't perfect but as Eric said, this is all pretty typical of a 14 year old race car and everything can be fixed. Eric is going to look at it at his shop and we will figure the best path to go with the belly pan. He may end up welding a new one on which means I wouldn't have to deal with all the issues with the holes in the chassis. Of course the issue with that is that it won't be so easy to remove it if needed!
Sunday, July 24, 2011
The Dismantling Continues!
It was another hot morning in the garage but I wanted to get the car to the point where I could remove the belly pan -- which I did. I continued to work my way to the back of the car and removed the coil, shift linkage, fuel cell cover, etc. Here is a pic of the fuel cell.

I noticed that there was a lot of sand and dirt around the sides of the fuel cell, especially on top of the belly pan that extends past the frame. This is a sure sign of fluid gathering in those areas. After I got the fuel cell out, I realized why that was the case -- it had been leaking. Looks like I will be buying a new fuel cell which is not a big surprise.

Notice how the duct tape at the bottom of the firewall is coming off -- another sign of a fuel leak. When expecting the cell I found green discoloration of the cell. Definitely time for a new cell -- that won't be cheap!

Here is a pic of the fuel cell area with the duct tape removed and cleaned up a little bit.

Time to move to the engine bay and the rear suspension. I removed the fire retardant material that was on some of the tubing that was next to the exhaust. It was not only safety wired on but also glued on with hi-temp silicone. The material was not easy to get off and as you can see there is still lots of hi-temp silicone left.

All those tubes are probably going to get cut off anyway so I don't plan on removing the silicone. I then removed the shocks and the other rear suspension parts. Here are a couple of before and after pics.


So, the easy stuff is done. I plan on tackling the belly pan next weekend. Here are a couple of pics of the frame after being cleaned up.


And probably one of the most important tasks -- I made room for my street car!


I noticed that there was a lot of sand and dirt around the sides of the fuel cell, especially on top of the belly pan that extends past the frame. This is a sure sign of fluid gathering in those areas. After I got the fuel cell out, I realized why that was the case -- it had been leaking. Looks like I will be buying a new fuel cell which is not a big surprise.

Notice how the duct tape at the bottom of the firewall is coming off -- another sign of a fuel leak. When expecting the cell I found green discoloration of the cell. Definitely time for a new cell -- that won't be cheap!

Here is a pic of the fuel cell area with the duct tape removed and cleaned up a little bit.

Time to move to the engine bay and the rear suspension. I removed the fire retardant material that was on some of the tubing that was next to the exhaust. It was not only safety wired on but also glued on with hi-temp silicone. The material was not easy to get off and as you can see there is still lots of hi-temp silicone left.

All those tubes are probably going to get cut off anyway so I don't plan on removing the silicone. I then removed the shocks and the other rear suspension parts. Here are a couple of before and after pics.


Subscribe to:
Posts (Atom)